a modern horsehair plaster

BE93F7FF-D1CF-4E57-84E3-33709F0B979B_1_105_c.jpeg

The walls in my house are plaster.

They don’t appear to be all that different from any other walls at first, but if you spend some time inside and pay a little more attention than usual it’s possible to notice the differences.  One of the first things you notice is that the temperature doesn’t fluctuate from room to room that much.  Due to its density and thickness, plaster naturally retains heat and regulates the temperature throughout the day.

It might just be me, but I feel like the walls sound thicker too.  When the door is closed, a room can become suddenly quiet even if the ruckus you were retreating from is right on the other side of the wall.  In general, everything feels more solid and dependable when the walls are finished with a thick coat of plaster.

When we turned our attic into a new upstairs room, I had to remove a section of the old wall to make space for the new stairway.  After the dust had settled, I was left with a gap in the plaster and a decision to make about how to fill it.

In most cases, it would be smothered with multiple layers of drywall and skim-coated to level with the wall around it.  However, since we’ve been responsible for this house, every addition we’ve made has  been tempered with an appreciation for its age and character.  Not necessarily to keep everything exactly as it was, but to work with how it fits together as a whole.

So, with that in mind, I went down the rabbit hole to learn more about the plaster that I had removed, and how it was put there in the first place.

In the 1930’s when our house was built drywall panels hadn’t yet become widely available, and plaster over wood lathe was still a common finish on the inside of most buildings.  The recipe and technique of applying it hadn’t changed much since our ancestors were applying it with their bare hands on a wickerwork of sticks.  It’s basically a mud-like substance capable of drying to a hard surface, held together with a binder and sometimes fillers to reduce it’s weight.

Judging from a sample of the plaster I removed it looked like that recipe included lime, horsehair and small bits of stone in the base layer, with a smooth white lime top layer.  Since I wasn’t going to have an easy time sourcing all of those ingredients, (without several uncomfortable conversations with horse owners) I started to think about using modern materials.

Fortunately, plaster is still a popular material in high-end residential construction, so finding an equivalent for the lime and stone mix wasn’t difficult at all.  I just went down to my favorite building supply house and picked up a few bags, ready to mix.  The wooden lathe was easy to source as well, being sold in much the same form as it was a century ago.  As for the horse hair, I needed something fibrous and strong, fine - with the ability to easily disperse in a plaster mix.  As it happens there is such a material, normally used in concrete countertops: fiberglass fibers.  Available for about $15 a bag, (which contains more than I will ever use in my life) it was a good modern replacement for horse hair.  So, with a batch of my modern mix ready for a scratch coat, I started pushing my first layer into the new lathe right next to the layers of plaster laid down ninety years ago.  

One major difference between historic and modern plaster is the method of bonding.  Modern mixes contain adhesives that allow the plaster to bond with a flat surface, much in the same way as drywall and joint compound.  However, older plaster is held together mechanically, by pushing deep into the lathe at first and then, “scratching” the surface of each layer to allow them to hook together.  This wasn’t a necessary step for my new plaster, but I decided to do it anyway just to stay true to the technique.

In the end, I don’t think plasterwork is a natural gift of mine.  Looking closely, it’s fairly easy to see where my work and the work of early 20th century artisans meet.  Even so, I felt like going through the process of understanding what they did and trying to interpret that in my own way makes me feel more connected to the house.

焼杉板 (Shou Sugi Ban)

blaze-bonfire-burn-672636.jpg

Humans have used fire as a transformative tool from the earliest parts of our history. The chemical reaction it initiates through heat and combustion can create anything from ceramic to steel, and the ability to change the properties of a material is one of the initial building blocks of civilization.

During the Edo period in Japan, it was discovered that certain woods, when exposed to fire under controlled circumstances by a skilled craftsperson could be made more resistant to rot, weather and warping. This process was called

焼杉板, (Shou Sugi Ban) which translates to mean, “burnt cedar board”.

The nature of this transformation is similar to what happens to a meringue in the oven. The sugars in the wood are consumed or caramelized, creating a water resistant resin. Excess moisture releases in the form of steam as the wood becomes drier and stiffer. The result is, like the toasted meringue, much more resistant to change and corruption.

Working within the inherent limitations and natural properties of a material will always create the most beautiful and lasting design. The Shou Sugi Ban process is a way to dramatically change the appearance and performance of wood while more deeply expressing it’s inherent character. The textures become deeper, contrasts in woodgrain are heightened and the particular shade of char is unique to each piece. With the application of time the color will lighten and change; from a deep, even brown to a weathered tapestry of brown, grey and black.

Traditionally, the process involved lighting a fire and slowly charring the boards a few at a time. More recently, some companies have created highly controlled systems to produce boards more quickly and consistently. Because of budget and limited space, (my neighbors might not be comfortable with a trench bonfire next door) I decided to use a simple propane torch to char the boards one at a time.

It took a while, and a fair amount of propane, but after some practice I began to feel when the wood had charred through just the right amount. I wanted to make sure to release the moisture and carmelize the sugars without burning away too much of the wood.

After letting them set and cool overnight, I lightly brushed off the blackened surface to reveal the woodgrain beneath.

As an added protection and to bring out the color I applied a generous coat of penetrating oil, which rendered an even dark brown finish across the surface.

It’s been several months since the siding was installed and as I prepare to char and finish the trim I’m still very happy with how it looks; though very curious to watch it develop with time.

the Fine and Ancient Art of Drywall

plasterer.jpg

Working in the construction industry, I think it's fair to say that there's an unspoken hierarchy among the various trades.  Since there's also a great deal of disagreement about the order of that hierarchy I won't dare to compile any sort of list here, but suffice to say that drywallers generally fall somewhat lower on that list than other trades.

To be honest, I'm not entirely sure why this is; whether it's the value placed on the work or some bias about the people who perform it.  For some reason, the trade that creates the finished surfaces that we all interact with more than any other is less valued than the ones we like to watch on HGTV.

However, I've recently had the experience of doing this sort of work myself which has given me a different perspective on it's value.

When I'm mixing up the mud, or scraping it against the wall, I realize how ancient and fundamental this work really is.  Even the name, "mud" evokes a time when we were using the bare materials we could readily get from the earth to create the spaces around us.  The motion of applying a finish like this to a wall is probably one of the oldest trade skills in human history.

In addition to being an ancient skill, it’s also not an easy one. The ability to create a perfect surface doesn’t come automatically or quickly. It takes a lot more time than I’ve spent so far to just reach out and be able to make a finished wall that’s both level and smooth. There are a number of tricks, workarounds and special tools that help make it easier, but in the end it’s just you, the mud and a simple, straight-edged tool.

What makes this work even more important is that it’s often one of the last phases of the construction process. When someone says, “we’re in drywall” it generally means that they’re getting close to the end. It’s also the last layer of material between whatever was built before and what we’re going to see when it’s finished, which often leaves the responsibility for the appearance of the finished product at the feet of the drywaller. They have to make corrections for imperfect framing, bad details, missing supports or difficult transitions that no one took the time to consider. Understanding how this work is done is critical for everyone involved, because it’s very easy to create a situation where a drywaller can’t make a space look or function like it’s supposed to.

So, if you find yourself underestimating the skill or importance of this particular trade, (like I once did) give it a try and I think you’ll change your mind.

160920-F-RN544-068.JPG

Insulation-nation,

Continuing to move forward with our attic remodel.  Now that we're done running all of the plumbing, electrical and HVAC through the walls, the next step is to cover it all up.  Moving on to air sealing and insulation!

This is the part where we really start to enclose everything and make it a habitable conditioned space; which means keeping the outside air, water and temperatures separate from the inside.  Air sealing keeps air and water vapor from moving through the building envelope, while insulation keeps heat either inside or outside depending on the season.  However, there is a product which does both; closed cell spray foam.

Foam-Insulation-Atticare.jpg

Spray foam comes in a number of different formulations and sizes, depending on the application.  For our remodel, we needed the highest R value per inch, (a measure of an insulation's efficiency) plus an air sealing technique that was easy to get right.  For this application, a large, 2 part spray foam kit looked like the right option.  It would allow us to fill the roof cavity with spray foam and easily seal around the edges and penetrations where air gaps normally exist.

Paper.Sketches.44.png

The only problem with this option is the price.  Closed cell spray foam can cost twice as much or more than the next most efficient option, which was going to keep us from being able to use it as the only insulation material.  Luckily, there is a system that is supposed to combine the air sealing qualities of spray foam with the cost savings of traditional batt insulation: Flash & Batt.

This system is pretty much just what it sounds like: you, "flash" on a layer of closed cell spray foam to air seal around the outside of the building envelope, then fill the remaining cavity with fiberglass, rock wool or cotton insulation batts.  This minimizes the amount of spray foam you have to use and maximizes the performance of the batts because of the superior air seal.

However, there is a potential downside.

When designing a building envelope, it's important to consider where the, "dew point" will be inside of the wall.  This is the point where the temperature is low enough and the humidity high enough to cause condensation.  If that point is past the vapor barrier, the moisture can't escape back to the outside and can cause any number of problems.  Because of this, the flash & batt system recommends a certain thickness of spray foam to ensure that the dew point falls somewhere inside the spray foam layer; in my region it's about 2-3 inches.

That being said, I'm not sure I'm going to sleep well trusting that this rule of thumb will hold true during the cold nights of winter and humid nights of summer.  So, if I accept the potential of moisture developing inside my building envelope, how do I let it out?  If it's unable to move through the vapor barrier to the outside, the only place it can go is to the inside.  However, since water vapor moves from high pressure to low, that means it moves from the wall to the inside during the summer, but that it can travel in reverse during the cold winter months and cause the same problem from the opposite direction.

Into this conundrum steps a new building product.

Paper.Sketches.45.png

Polyamide film is a new type of membrane that is installed at the innermost part of the wall, directly underneath the drywall.  When the humidity is high, the pores in the membrane open up, allowing for water vapor to leave the cavity to the lower humidity inside the house.  During the winter those pores close up, preventing the more humid inside air from migrating into the wall cavity.

What I've learned through all of this is that no one product offers a perfect solution to the design on a building envelope.  All of the elements have to work together as a system, sometimes balancing each other out.  As new products and ways of doing this come along, it's always important to remember how it works as a whole.

Better together,

We're drawing to a close on the bulk of construction for the upstairs remodel at our house, working through the inspection process with our local building inspector.  So, as we're passing this important point in the process, I've been thinking about the way we got here.

Getting to this point has taken a full two seasons longer than I'd planned, delays caused by things that I didn't anticipate, along with a number of changes that I decided to make during the construction process.  Keeping up my stamina during that whole process has been a constant challenge.  Much of the work that had to be done was outside my experience and in many cases I had to do it very slowly or even multiple times to get it right.

Although this wasn't an individual effort, (I had help and guidance from family and friends throughout the whole process) I did end up doing most of the work on my own, which is probably the cause of those changes and delays.  It's also worth mentioning that this was mostly by choice, done in an effort to cut cost and to be able to control the process.

However,

Every time I get a chance to work with other people on a project, the benefits become immediately clear.  While working alone gives you control, working together gives you clarity.  You act as a check on each other, unbiased participants in the other's thought process.  In addition, the perception of your own thoughts becomes naturally more objective when speaking them out loud to another person.  The best work is always going to come from collaboration, not just inspiration.

I am happy with the way this project is turning out and I'm sure that by taking most of the work on myself we've been able to do a lot more with our budget.  But, if I'm given a choice on the next project, 

I'll be part of a team.

Plumbing the sink,

IMG_3222.JPG

Plumbing is a cyclical system; water comes up, then goes back down and the air in the pipes has to move with it.  Because of this, (and also to allow the escape of less-than-appealing odors) every plumbing system has a vent to the outside, sized to allow for enough air to come into the system when the draining water displaces it.

After I finished installing the drain lines for our sink I realized that it illustrates this point really well.  There is a line of pipe below that the water flows down and another line above that makes a circle between the vent going outside and the drain going to the sewer.  As water flows through the pipe on the bottom and displaces air, the pipe above allows air into the system to replace it.

air admittance valve.jpg
Side note: If your pipes seem to drain slowly and you hear a gurgling sound, it might not be a clog; it might just be that the plumbing isn't properly vented.  If that's the case, there's something called an, "air admittance valve" that can normally be installed without too much trouble.  It's designed to respond to pressure in the pipes and to allow air in without allowing sewer gasses out.

Keeping cool,

One of the more common problems affecting 2nd level additions is the increased solar heat gain coming from the rooftop in summer.  When the roof heats up, it radiates down into the space through whatever insulation envelope has been put in place.  

To deal with that, you can create a space between the hot roof deck and the insulation, as well as vents at the top and bottom to allow the hot air to naturally flow out.  

 
roof venting.png
 

An additional step that I'm taking is to create that air space using an insulation board coated on one side with a radiant heat barrier.  That should help to inhibit the transfer of heat in the first place.

IMG_3202.jpg

The next level of insulation is going to be a closed cell spray foam, a material with great R value and ability to seal against air and vapor transfer; so this extra step might not be necessary.  However, I'd hate to find out that it is once the first summer rolls around.


Catching up

The upstairs remodel at our house has been ongoing now for the better part of six months, during which the progress has been pretty gradual.  However, the blog posts so far haven't really kept pace with what's actually happening; so I thought I would make one to catch up with where I'm at now, with the intention of creating more regular posts in the new year.

To begin with, the scope of the project was to add space in our previously unused attic: a bedroom, bathroom and as much open space as possible.  To achieve this, we needed new stairs and a pair of dormers to add headroom to what was currently a low gable roof. 

Paper.Sketches.60.png
Paper.Sketches.59.png

 When we left off,  a stairway had been added where there used to be a closet and the floor structure had been strengthened to support the additional weight.

After that, we installed the subfloor while running the  plumbing, electrical and HVAC lines up from the basement.   Originally, I was conflicted about how to heat and cool the new upstairs.  One of the more popular solutions is to add a new system to independently deal with the new space, very often a mini-split compressor/heat pump; capable of both heating and cooling.  However, tying into the existing system would save us the cost of a new unit and since we just upgraded our heating and cooling units, would be just as efficient as a new one.

The biggest challenge to that solution was where to run the ductwork.  Luckily, there is a closet with a hard-to-reach back section that was conveniently located above the HVAC unit; a subtle place to hide the new ductwork.

After everything was ready from the floor level down, it was time to let the new dormers peek into the world.   

IMG_2866.JPG
IMG_2934.JPG
IMG_2994.JPG

 Taking the roof off and letting the light in definitely changed our perspective on the space.  Through the newly roughed in window openings we could see the views we had planned when first starting the design.

Truthfully though, as the space started to take shape we made a few changes on the fly in reaction to some things we really didn’t understand in the abstract.  

 Even with all of the design and visualization tools I use, it’s important to be flexible when an opportunity presents itself in the middle of construction.  The process that allows you to see the whole design at the outset will help to interpret how one change will affect everything after.

So, with the roof on and the interior walls going up, we’re getting ready for a city inspection in the next month or so.  I’ll try and keep up weekly posts with more details and some interesting fails as they come.

Thanks everyone for being patient, (especially my family).  It’s been great to be able to share this process. 

FullSizeRender.jpg
IMG_3101.JPG
IMG_3103.JPG

floor framing,

Previously, the only access to our attic space was a small hatch in one of the hallway closets.   Our new upstairs will need a more reliable means of access; a  functional stairway.

However, during construction this new stair is going to be subjected to the bumps and scratches common to building projects.  So, we decided to make a temporary, "construction stair" out of standard dimensional lumber until the majority of the upstairs is complete.  For the final stair I'm thinking about using a technique called a, "housed stringer", where I will mortise a space in the stair stringer for the risers and treads to sit, secured by wedges from the back.

 This has the benefit of being much more stable than a normally constructed staircase, as well as saving the step of cutting a piece of finished trim to run around the treads and risers.

After creating a means of getting upstairs, the next step is to make the upstairs walkable and able to support the new floor load.  To do this, we're going to sister on a joist capable of carrying the load onto the existing joists.  This will connect the new and existing structures, strengthening both and giving us the maximum space to work with for running the new ductwork through the joist cavities.

With the framing in, the next step is to make sure that all of the utilities,(electric lines, plumbing, heating and cooling) that have to run through the floor are installed before we put down the subfloor.

IMG_2734.JPG

construction stair

housed stringer

housed stringer


start at the bottom,

Before you plan on building something, it's always best to consider what's underneath it.

So before we started anything with our upstairs remodel, we looked at how it would affect the structure below.

In order to create a stairway to the second level, we would have to add a load to a formerly non-bearing wall.  After determining that it was able to become one, the load had to be brought down to the foundation with a new beam and column.

IMG_2895.JPG

Also, it had to be considered that this column would be joining an existing fraternity of columns and we wouldn't want it to look out of place.  So even though the structural calculations didn't necessitate a column so wide, we made it a size to match the one's around it, with a baseplate wide enough to transfer the load to the slab.

Similarly, where the new beam was being placed, it would be right next to a steel beam that had been there for over 80 years.  A steel beam didn't really provide the best cost/performance ratio for the new structure, so we decided to use a glue-lam beam the same depth as the existing steel beam, rated to carry the load.  Glue laminated timber beams can be an attractive option for exposed structure, as long as they are purchased in, "architectural" or, "premium" appearance grade.

Having set the column and tightened up the beam, it's time to move on to the stairway.  Onward and upward!

stair section.jpg
IMG_2901.JPG

staying put by moving up,

staying put

by moving up

So,

We recently stepped into the situation that happens to a lot of people; where for one reason or another our house is becoming too small to accommodate the needs we're starting to develop.  We're soon going to be short by one room, plus about 500 additional square feet of space we need that's beginning to pile up on all the flat surfaces in the house.
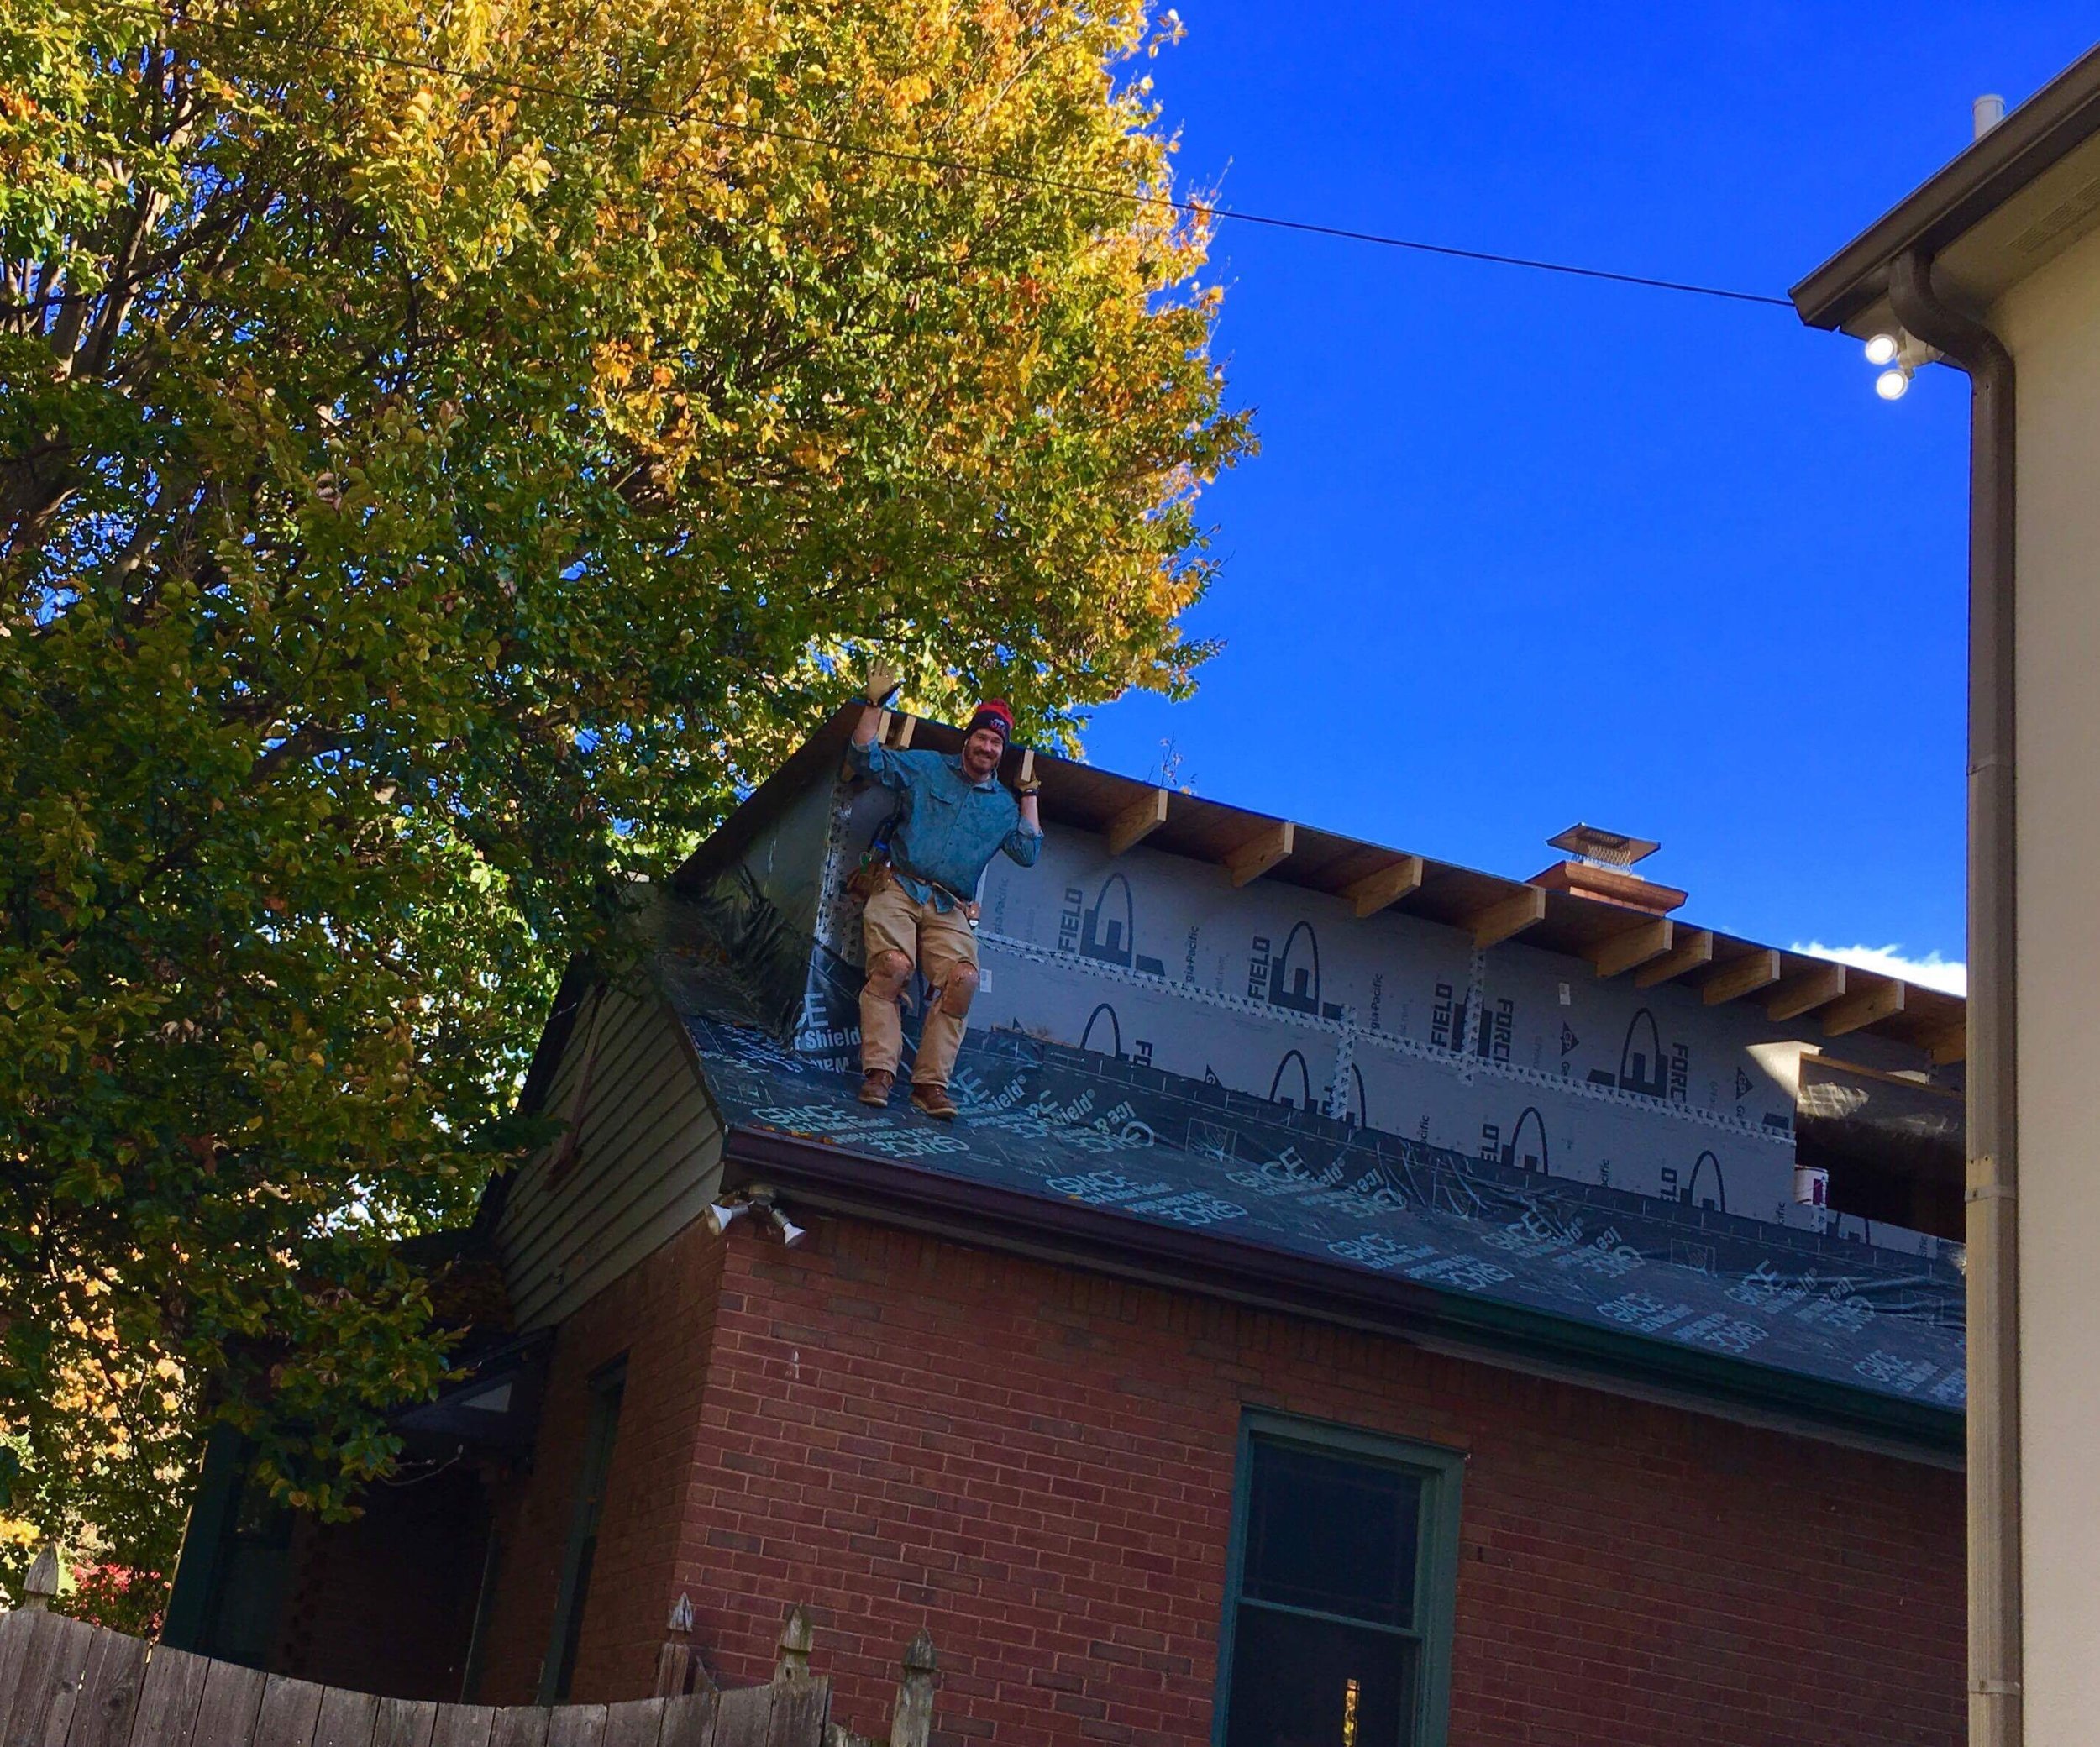
Some of this was having another child of a different gender, some of it seems to be the natural expansion of our lives; like rings on a tree.  More privacy, storage and a greater diversity of spaces are all things that seem more important now.  We'd like to have a place to be quiet, (reading, napping, listening to music) and a place to be loud, (crafting, dancing, making music) which for obvious reasons they can't really be close to each other.  Something our current 1 story house won't allow.

Regarding our stuff: we've all gone through the Kon Mari process more than once for everything in the house and there's starting to be an excess of things that are useful and give us joy, which I'm sure will only increase once the baby gets object permanence and starts to care about what things he has around to chew on.  It's not that we have too many things; the things that have a place in our life are starting to not have a place in the house.

Admittedly, people have raised much larger families and done bigger things in houses smaller than ours, (we just finished reading, "Little House in the Big Woods").  I'm sure we could make it work with what we have now.  But it's becoming clear that our quality of life would increase dramatically with a little more space to live it in.

But,

We love our neighborhood.  We love our house.

Looking for a new house all last summer just lead us back to what we already had.  Like a favorite pair of jeans that would look so cool and be so comfortable if we could just zip them up!  

After almost a decade of living here we've developed a fondness for the details and quality of material that an older house offers.  The floor plan is so clean and functional I would probably choose the same layout if we'd been the ones to build it in the 30's.  We've invested in the air conditioning and new energy efficient windows, such that the house costs very little to heat and cool, (in part because the plaster walls and brick facade hold temperature so well).  We've kept our original kitchen cabinetry, matching the details in everything we've added to make it work better for us.  It's become part of who we are.

The neighborhood around us is an even bigger reason to stay.  There's a healthy flow of new people, along with a group that's been there for most of their lives.  Being next to a cultural district there's a similar group of businesses, new and old that provide everything we need within walking distance.  There's a bike trail to downtown that's two blocks away, with a large park two blocks in the other direction.  If we want to hop in the car, our location in midtown can get us anywhere else in the city without getting on the interstate.

Recently, we've also seen a number of new buildings go up; three and four stories taller than everything around them.  Businesses are looking for more space in the village as the number of people who want to live here is increasing.  This seems to correspond with a trend in the houses too: small homes growing upward and to the side in an effort to provide more square footage.


IMG_2866.JPG

For us, the attic is a perfect place to find that space.

In a way, it's something I've always wanted to do.  Our house came to us in such good original condition that I knew I would feel guilty marring it's early 20th century details.  The attic is like a clean sheet of paper; a chance to play with the elements of the existing house in an entirely new way.

So we've put a plan together, gotten a building permit and are moving forward step by step.  It's going to take awhile, but I'm looking forward to the process and seeing where it's going to lead.

finding winter,

Every winter, my family packs our skis, puts on our cold weather gear and heads in the direction of snow.  

This seems counterintuitive when I try to explain it to people, but for me it's always made sense to spend the coldest months embracing what they have to offer instead of hiding away inside until spring.  And to find the best that winter has to offer, there are few better places than northern Michigan.

Winter on this peninsula defines the culture more than any other season.  As soon as the lakes freeze over there are people testing the ice to see when they can move into their fishing huts. Fresh snow is immediately criss-crossed with snowmobile and cross country ski tracks, with snow-shoe prints in the deepest drifts and thickest parts of the forest.

Inside, there's local beer with fried smelt, fireplaces and the kind of personalities that only develop in areas where people have to get along in close quarters for most of the year.  

Which might be why they've developed so many wonderful things to do outside.


Once you get moving, your body creates a balance with the cold and the snow.  The part of our brain that regulates the metabolism to keep you alive starts working again and the dull ache of dormancy starts to fade away.

Then, when you don't feel cold anymore; you can look around a bit and see what the view through the window has been obscuring: that winter is just as alive as any other season.  The snow and ice grow and shift to create paths and barriers, allowing us to move in ways we couldn't at any other time of year.  Even on the cloudiest and darkest days, the light dances around in  unexpected places.  And, when you find yourself in the deepest part of the woods, if you stand as still as possible, the silence is strong enough to come alive.

the Craft code of ethics

Having a code has always been important to me.

When I was growing up, I was given a lot of information about how to conduct myself; my thoughts and actions.  The focus of this at first was to stop me from hurting myself, then to stop me from harming others; the complexity and scope of which continues to expand to this day.

The exercise for me was to work out which parts I should commit to.  Which ideas were sound enough that I would use them to guide me, (even when I didn't feel like it) and what structures could I put in place that would consistently point me towards them?


Similarly, as Craft has developed, a set of guidelines have emerged that I've used to define what we do and guide how it's done.  Some of these ideas require us to do more, while others challenge us to limit ourselves in ways that focus and improve what we do.

The list has been more of a nebulous word cloud until now, and I'm sure it will continue to change and develop.  But in an effort to hold myself accountable and test my beliefs through discussion, I present to you:


the Craft Code of Ethics


Process

The way that something is made is just as important as the thing itself.  Where the materials come from, the methods used and the people involved; all in relationship with the living environment and the common good.

Transparency

Never profit from another person's lack of knowledge.  Be accountable for everything you do.

Mutual respect

Between those working together at all levels, a relationship of mutual respect and trust; sustained through honesty, communication and empathy.

Truth in material

Show what something is really made of.  Let the details, feel and finish show the nature of the material and the way it is made.

Value

Your process should always put the result within reach of regular people.  It should be affordable, useful and beautiful.

Community

Value the relationships you make with suppliers, craftspeople and customers.  Support them and foster connections between them to build the community.

Humility

The opportunity to create is the opportunity to serve.

more options for the Braeburn light,

Over the years since I released the Braeburn sconce, it's been thought provoking to see the many ways that people have chosen to use it.

It's called a sconce, which implies a secondary light source mounted on the wall; but I've seen it mounted on the ceiling effectively lighting up an entire room.  It works as a vanity light in the bath, a task light or an accent; standing by itself or in pairs and series.  Through the creativity of my customers it's become more versatile than I could have designed it to be.

So, in an effort to keep up, I'm offering more two more fixture types that create more options for the number and direction of bulbs that you prefer.

Depending on the direction you turn the porcelain fixture and the type of bulb you chose, there are so many different ways this light could be used.  I'm going to keep playing with putting it in different circumstances and I'd be curious to see how you've chosen to use yours.

(ecologically) lighter packaging

When we send our products out into the world, we like to make sure that the way we ship them is held to the same standard as the products themselves.

This means that our boxes and packing materials are locally produced, (just up the road in Fort Wayne) and that they can either be recycled into new products, or in the case of our packing peanuts, biodegrade back into their natural components.

So, starting this holiday season we've partnered with UPS to offset the carbon cost of shipping for all of our products.  Through investments in alternative energy, emissions reduction strategies, next generation  vehicles and participation with global environmental organizations, they offer a multifaceted way to let us make things more beautifully, all the way to your doorstep. 

 
fullsizeoutput_7b4.jpeg

84 Lumber's Tiny House,

From the land of the Pennsylvania Dutch, the 84 Lumber is offering a quartet of pre-manufactured homes with a footprint of about 150 square feet, one of which is on tour and passed through my area last week.


The models are all designed to be used on top of a trailer, which is included with most of the build options.   Because of this, you could potentially avoid some of the barriers that local ordinances sometimes provide when constructing a smaller dwelling unit, either as a stand-alone home or accessory structure. 

Additionally, being mobile allows for a more itinerant way of life while still having a place to call your own.


They offer 3 packages with different levels of pricing:


1. Build your own: Trailer + Plans
This DIY package for Tiny Living by 84 Lumber includes the architectural blueprints for one of the tiny home models, a materials list, and a trailer built to meet the requirements of the selected house. All materials on the list and essentials to build a tiny home can be purchased at a local 84 Lumber.
2. Semi-DIY: Tiny Home Shell + Trailer + Plans
The Semi-DIY package includes a “shelled in” tiny house placed on a custom trailer, complete with windows, a door, and a shower. The package also comes equipped with the architectural blueprints and a materials list for DIYers to add their own exterior and interior finishing touches.
3. Move-in-ready: fully outfitted tiny home
A completed tiny house that is fully outfitted both inside and out. The home is built on a custom trailer and ready for move-in and immediate travel. These homes take eight to ten weeks for custom completion.


These homes from 84 Lumber are not the only option being offered for contemporary small living, but they are an example of a major player in the construction industry investing in the very old idea of thrift and self-reliance being a path to true home-ownership.


the homestead

photo credit Watson Brown

photo credit Watson Brown

The shape of a traditional North American farmhouse tells the story of a home put together one piece at a time as the family inside grew and prospered.  The main unit comes first, with a perpendicular section added later along with any number of shed roofs and additions to the sides.

This method of building worked very well for people living on the frontier, where they had to rely on themselves for the materials, labor and funding needed to create a place to live.  Without builders or banks, people would create a starter home with whatever materials were available and make improvements and additions as their means allowed.  Because of this, these homesteaders owned their farmhouses from the very beginning; freeing them to use that income to build a better life.

Though the challenges of making a home have changed from our frontier period, (typhoid and bears versus schools and crime rates) the desire to have a place where we can settle and build our lives is still the same.  Additionally the opportunities from this method of building that home in this homesteading method also remain the same.

Though the style of a traditional farmhouse might not express the way we live our modern lives, building in phases can break down the construction costs of any type of home into manageable pieces; avoiding the need for a lifetime of indebtedness to the places we live.

More to follow on some ideas for how this might be done.


the genetics of home,

A couple years ago, we began what has become a gradual kitchen remodel in our 1930's Tudor.  It began with a new shade for the light, then appliances and cabinetry, flooring and now a new tile backsplash. 

Before we started, I had an, "Old Yeller'" moment with the kitchen as it was.  Many of the original pieces were there, but most in need of extensive work.  We had to decide if we could get what we needed working with what we had.

What we found was that the decision to honor the original parts had a positive effect on the decisions that followed.  By choosing to match the character of the existing kitchen, the new parts felt joined with the rest and stronger as part of the whole. 

Each home is conceived and built with a unique set of parts and ideas; so when something is added that doesn't fit with those, "genetics" it undermines the space as a whole.  Making that decision involves taking the whole into account with each detail we add or change.

The benefits of limiting ourselves in this way can be powerful, but subtle.  Matching the, "cove and bead" profile on our existing cabinets with the ones we added isn't something that's immediately obvious, but it's those little things that we subconsciously observe when we walk into a space that give a feeling of completeness and order.

The unity of details, colors, textures and shapes is what makes a space work as a whole.  No matter how beautiful or wondrous one part is on it's own, if it doesn't belong within it's surroundings it undermines itself and everything around it.

Existing

New

IMG_1712.JPG

caring for the country

DSC02910.jpg

As you find yourself driving between cities on one of the smaller highways that pass through our rural landscape, you sometimes catch a glimpse of an old building off in the distance, peeling or crumbling away among the wildflowers and open land, held back from the road by old fenceposts and wire.  It’s obvious that it once was well cared for and the lines of wear and gravity show that it has stood firmly in that place for some time.  You might find yourself wondering what it would be like to live there, to fix it up and find yourself waking with sun coming through the window and to look out at the same highway in the distance, from the perspective of a very different life.

These rural places are a significant part of our collective culture.  Even for lifelong urban dwellers, the image of a farmhouse or ranch stirs feelings within us that speak to a part of ourselves.  These sorts of places were the starting point for every city and town that came after, the cradles of our society.  Self-sufficient homes for independent people, many of them still remain outside the cities that grew up next to them.  Also, because of the slower pace of development and change in most rural areas, many of these properties retain much of their historic attributes, marking a place in time and a way of life in our history.

IMG_1352.jpg

However, part of the reason that many of these properties are in decline is the same reason that they remain in a historic condition: the real estate value of a property follows the vitality of it’s community.  There has been a steady tread of migration to urban and suburban areas worldwide that has left many rural communities with missing parts.  The structure of a small town economy is delicate and easily affected by just a few people deciding to leave, taking their skills and resources with them.  The fragile bubble of prosperity depends on the commitment of the community to itself, remaining cohesive with the strong influences of a global economy and the draw of major cities.

Living in the country isn’t easy.  Much of what would be taken care of collectively in denser communities becomes an individual responsibility.  However, that doesn’t mean that a network of community services doesn’t exist.  The activities of governance and social services are more informal and often depend on developing relationships with people who can help you and developing your own skill set to help others.  The bond between neighbors becomes a part of your daily life, creating a sense of belonging that speaks to a very basic part of human nature.

If you find yourself feeling drawn to these places and the life you could see for yourself there, it is becoming increasingly possible to make that a reality.  If the property is legitimately historic, there are resources through the national register of historic places to help you restore it and increase it’s value.  For a person or family starting out as property owners, the cost of land or buildings is much more affordable and could provide an opportunity to try new ideas that need space to develop.  Also, for many of us the path of our careers is taking us further away from traditional offices towards a professional life that is primarily digital.  People are increasingly able to leverage themselves across geographic lines and to access the skills and goods of others in turn.

 Access to the most important information and culture is no longer restricted to the trendiest cities and exclusive groups.  More people are setting out to make their own homestead to do something different in America’s most traditional communities.  So, if the rewards of country living are something you want for yourself, there are many beautiful places waiting to be cared for as well as communities that need new members with energy and ideas.

the value of golden brown

the ancestral skillet

the ancestral skillet

The tool that I use most in the kitchen is the old iron skillet that my mother passed down to me.

This piece is called into service almost every day for any number of different cooking tasks.  It's our preferred method for reheating leftovers, making leisurely breakfasts or preparing anything that needs to be golden brown and delicious.

However, this certainly isn't because it's easier to use and maintain.  It's heavy, with a handle that gets almost as hot as the cooking surface.   Keeping that surface smooth and non-sticking involves a lot of scrubbing with salt and re-seasoning whenever I have a chance.  When it's really bad I can de-glaze with a mixture of water and vinegar, but just rinsing it off and throwing it in the dishwasher will never be an option.

So, why has it outlasted every other piece of equipment in my kitchen?

For me, it has to do with how I feel when I use it; or how it looks in it's regular place on top of the stove.  It was a part of my mother's life, and now it's become a part of mine.  I know that if I keep up my side of that relationship, it won't ever let me down.  It's value and usefulness will never decrease over time, while it becomes more beautiful every time I cook with it.

With the way things have been for the last few years, many of us a wondering what sort of wealth we'll be able to accumulate for the future.  How much money will we need to make sure we can be comfortable and secure?  How much does it take to give us the life we want?

How we collect and develop ourselves financially is an important part of the answer to these questions, but I think the full answer for me involves things like my skillet.  It's worth doesn't have to do with how much I could buy it for, but the place it has in my life.  It supports me in ways that other pans couldn't, regardless of the price.

The things that make our lives better and more secure can't be defined solely through the investment of money, just as people can't be defined in that way.  For someone or something to have value, you have to build a relationship.